
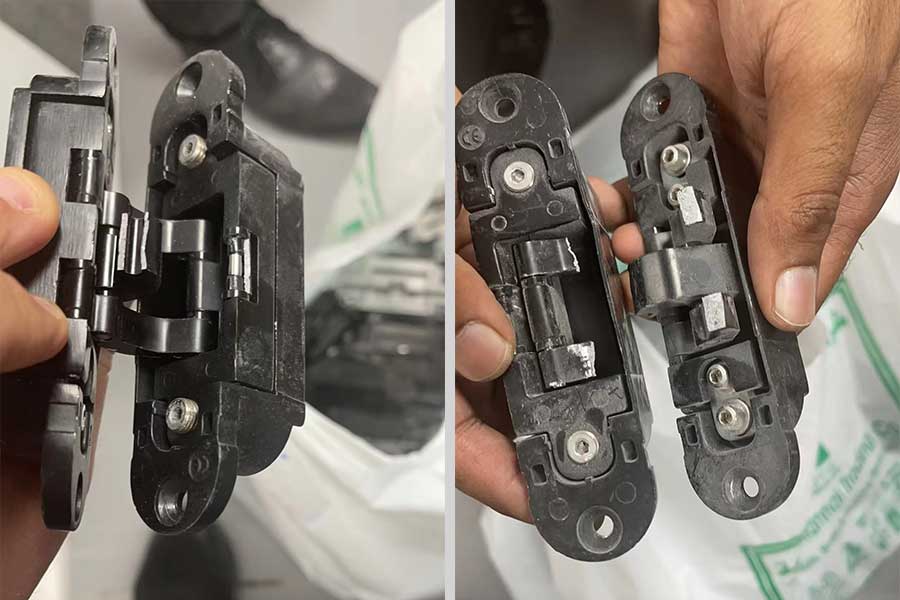
The concealed hinges broke in a high-end Abu Dhabi project left our client frustrated and worried about long-term durability. I felt challenged to find a lasting fix.
We solved the problem by analyzing the failed hinges and then quickly developing a superior product using stainless steel precision casting and improved 3D adjustability. These steps ensured the project passed final inspections and operated normally.
Every project teaches us a lesson. When our client reported failures, I dove into the details and challenged conventional process shortcomings. If you continue reading, you will understand how we turned a major issue into a demonstration of our advanced production methods and commitment to quality. Stay tuned.
The term "concealed hinge" typically refers to hinges hidden from view after installation. I first encountered these names when working on complex projects and realized many refer to them as "invisible hinges" or "hidden door hinges."
Concealed hinges are also known as invisible hinges or hidden door hinges. They fix the door firmly without exposing the mechanism, providing a clean, modern look for entry or internal doors.
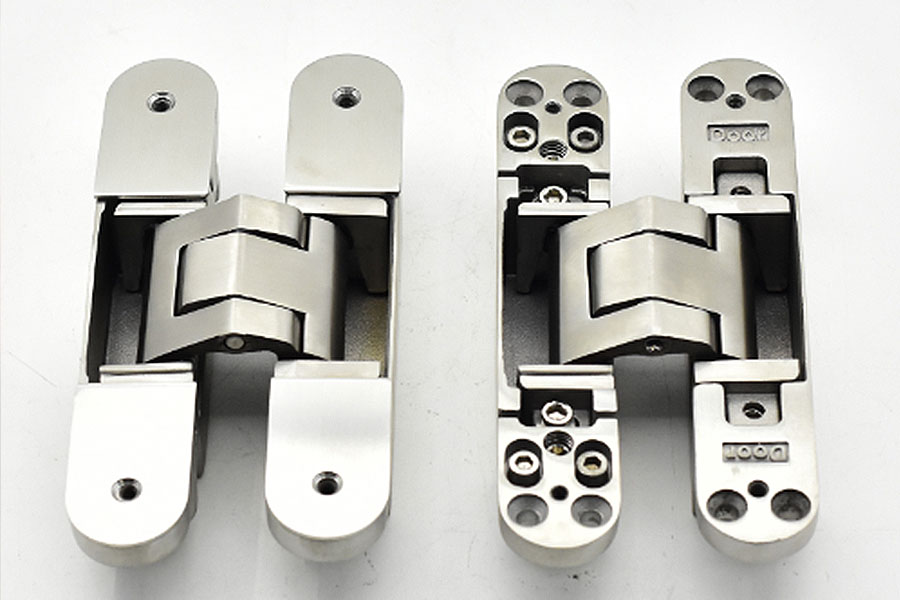
In my experience, concealed hinges are central to both design aesthetics and door functionality. I learned that many people use different names, yet the essence remains the same. They are designed to be flush with the door edge and frame, offering an uninterrupted visual line. Below is a simple table comparing common names and their features:
| Name | Description | Application |
|---|---|---|
| Concealed Hinge | Fully hidden when installed | Entry and internal doors |
| Invisible Hinge | Mechanism is not visible from the exterior | High-end modern installations |
| Hidden Door Hinge | Emphasizes minimal visual disruption | Residential and commercial |
This table shows the overlap across names but highlights a uniform function: maintaining the door's aesthetics while allowing smooth and stable movement. My own project experience confirmed that precise terminology helps align expectations with product performance. It is not just about naming but ensuring the hinge meets the demanding standards of modern door installations.
I have seen broken concealed hinges before and know that repairing them depends on the damage severity. Often, minor issues might only need adjustments, but major breaks require replacement with a higher-quality solution.
Broken concealed hinges can sometimes be repaired by reinforcing connection points and realigning the components. However, if the structural integrity is compromised, it is better to replace them with improved versions that offer enhanced strength and precision.
When I reviewed the failed hinges from our client's project, I noticed that the breaks were due to manufacturing flaws. While repair might work on a slight defect, it was clear that the compromised connecting areas could not deliver reliable performance. In these cases, I recommend a complete replacement. I compared repair methods by creating a table:
| Issue | Possible Repair Method | Recommended Action |
|---|---|---|
| Minor misalignment | Realignment and tightening of screws | Repair if only slight errors exist |
| Structural breakage | Reinforce with additional components | Replacement is preferred for reliability |
| Material fatigue | Patch reinforcement | Replace with high-strength, precision parts |
This analysis reinforces that the repair option must be cautiously selected. I advised our client that our enhanced design could replace the broken parts entirely while ensuring long-term performance, preventing similar issues in future installations.
I have always asked myself why door hinges break. After analyzing several cases, I found that the causes are usually a mix of insufficient production processes, material weaknesses, and installation errors.
Door hinges can break due to low-quality production techniques, improper stress distribution during installation, and inherent material fatigue. The issue often stems from a weak connecting process and poor adjustment mechanisms.
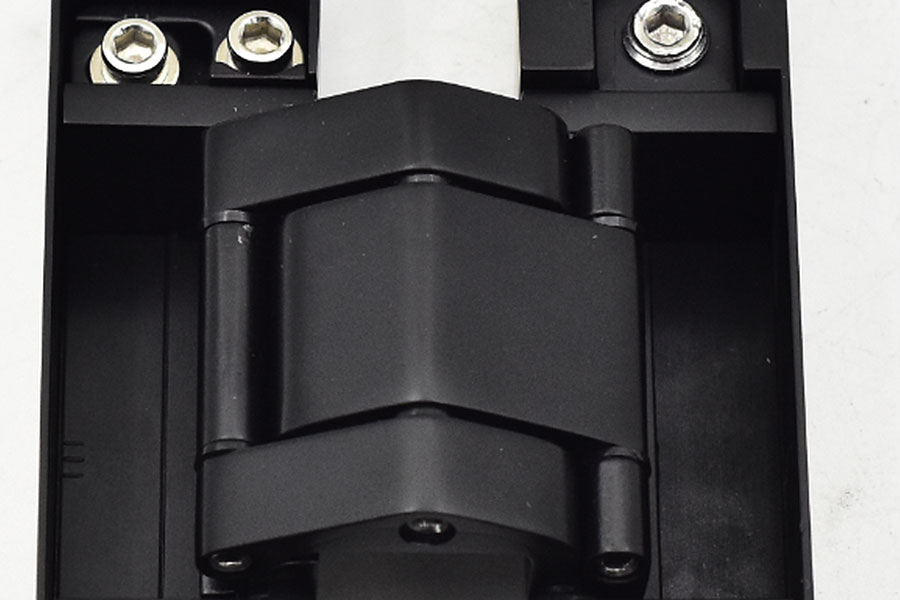
During the Abu Dhabi project, I observed that the hinges failed because of a lack of density in the connection points, which led to reduced load capacity. I also learned that inadequate 3D adjustability in the installed hinges may cause stress and deformation. My technical team used a detailed checklist to diagnose the problems:
| Potential Cause | Observed Symptom | Effect on Performance |
|---|---|---|
| Low production density | Weak connecting points | Reduced load capacity and early breakage |
| Material choice issue | Inconsistent material strength | Increased risk of fatigue and failure |
| Installation misalignment | Excessive side pressure | Deformation and malfunction |
This breakdown helped me communicate with the client clearly. I explained that external factors such as door weight and installation speed can exacerbate poor design weaknesses. We ensured that our new solution addressed each factor with improved production processes and design enhancements to avoid repeating the same mistake.
I discovered that adjusting concealed hinges is straightforward if one follows a clear process. I have adjusted many hinges by carefully turning screws to cater to door-frame gaps.
The adjustment involves loosening screws, repositioning the hinge relative to the door, and retightening until the door aligns perfectly with its frame. This method corrects any misalignment and improves door function.
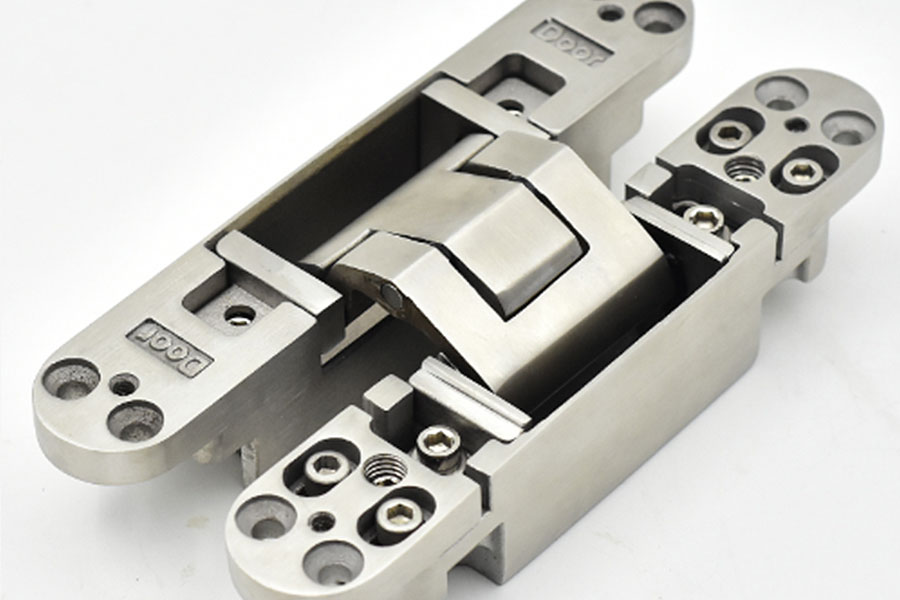
In our experience with architectural projects, aligning a door correctly is crucial. I learned that concealed hinges with 3D adjustability allow simple corrections at three axes. This means you can adjust vertically, horizontally, and in depth. The process is aided by specially designed external molding that prevents excess pressure on the hinge. Below is a detailed summary:
| Adjustment Step | Action | Benefit |
|---|---|---|
| Step 1 | Loosen the screws | Allows movement without resistance |
| Step 2 | Shift hinge position | Corrects door misalignment |
| Step 3 | Re-tighten and check | Ensures stability and smooth operation |
| Step 4 | Test open/close operation | Validates proper door functioning |
I always recommend a careful approach. In my project experience, even a slight neglect in adjustment led to early wear. Our improved design offers clearer adjustment guidelines to installers. I made sure that every new hinge came with clear instructions to reduce any guesswork during installation. This attention to detail is what sets our products apart in the market.
I have worked with a variety of hinges over the years. It is important to differentiate between them to choose the best one for the project. The main types I encounter are concealed, pivot, and surface-mounted hinges.
The main types include concealed hinges for a clean look, surface hinges which are visible, and pivot hinges that support heavy doors. Focus on concealed hinges if you want a modern, refined appearance without any hardware on the surface.
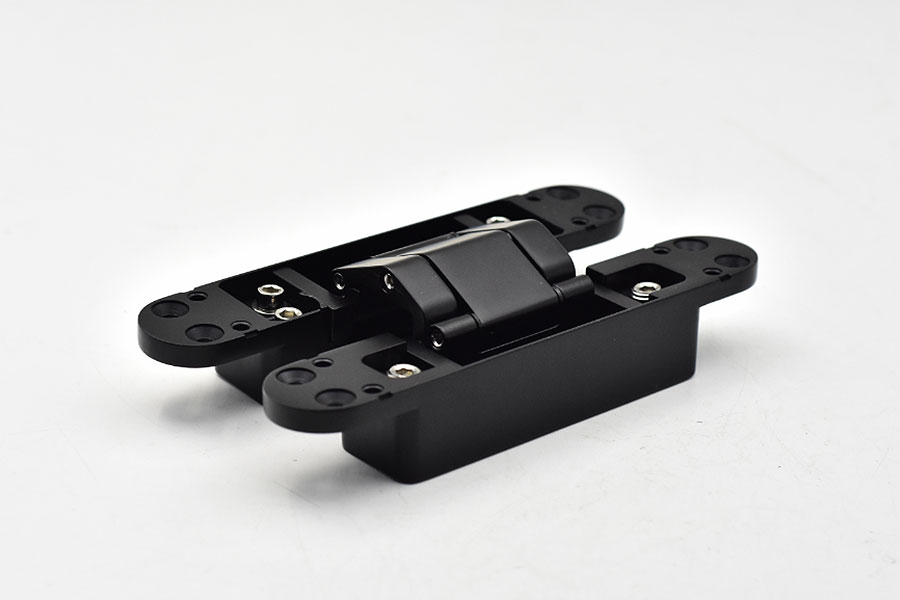
Through my hands-on work, I noticed that each hinge type addresses different construction needs. Concealed hinges are preferred in upscale projects for their hidden installation and neat finish. I compared the differences in the table below:
| Hinge Type | Feature | Ideal Use Case |
|---|---|---|
| Concealed Hinge | Hidden in installation | High-end residential or commercial doors |
| Surface-Mounted | Visible and robust | Heavy-duty or industrial applications |
| Pivot Hinge | Rotates from a fixed point | Large, heavy doors requiring extra support |
This table shows that when you evaluate project needs, concealed hinges are often chosen for elegance and functionality. I have seen multiple cases where project aesthetics and operational reliability both rely on selecting the right hinge type. Our project in Abu Dhabi underscored that using low-quality concealed hinges from other suppliers can lead to failure, while our robust design meets both visual and technical standards.
I always stress that the number of hinges on a heavy door is critical for safety and longevity. In my practice, I follow standard recommendations with caution.
A heavy door typically needs at least three concealed hinges to distribute weight evenly. Adding an extra hinge enhances stability, especially when the door experiences high traffic or frequent use.
Through my testing and field experiences, I found that using only two hinges on a heavy door often results in uneven stress and potential failure points. I recommended three or sometimes even four concealed hinges depending on door size and weight. The following table summarizes my analysis:
| Door Weight | Minimum Hinges Needed | Additional Recommendation |
|---|---|---|
| Light to moderate | 2-3 concealed hinges | Consider extra for frequent use |
| Heavy and oversized | 3-4 concealed hinges | 4 hinges for extra security |
I always carefully inspect each door during installation. In our Abu Dhabi project, I advised replacing faulty hinges with a design that uses the optimum number of hinges. This distributed the load more evenly and improved overall durability. Determining the correct hinge count is a critical step that avoids costly rework later and ensures client satisfaction.
I recall the stressful moments when our client in Abu Dhabi reported multiple hinge failures. Initially, the concealed hinges supplied by another vendor showed fractures and deformations on internal doors. I listened carefully to their concerns. Together with our technical team, we examined the returned samples and reviewed installation videos. We found that the connecting areas suffered from low density and insufficient strength. Additionally, the limited 3D adjustability created extra pressure during installation.
We completely replaced the defective concealed hinges with our improved design. Our new hinges use a stainless steel precision casting mould and an enhanced outer shell mould that boosts strength and adjustability. Comprehensive testing, including a 100,000-cycle open-close test, confirmed reliability, and the project passed final inspections without further issues.
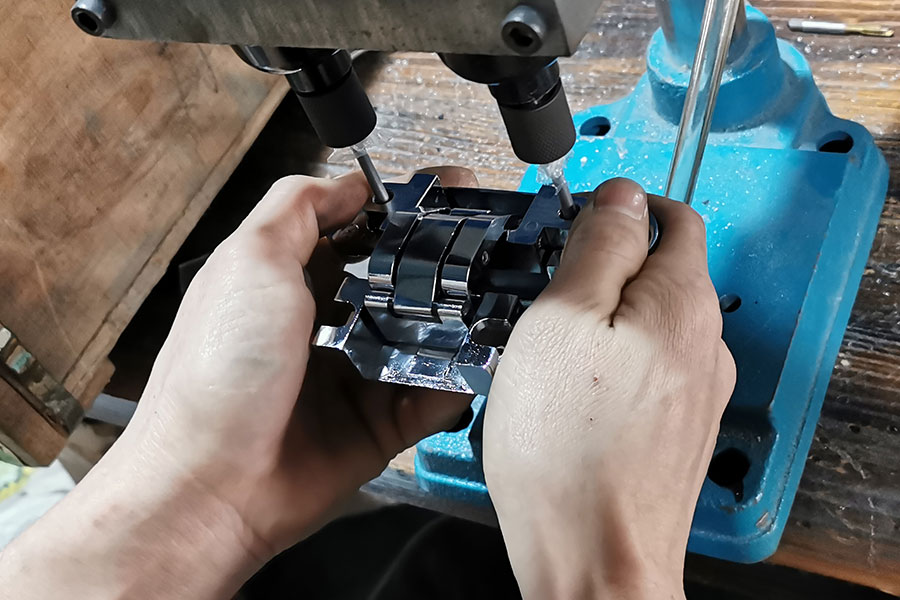
I then led our technical team in developing a clear action plan. We started by crafting a stainless steel casting mould that ensures higher precision and density in the connecting points. Next, our design of the hinge’s external shell improved the overall structure by increasing rigidity and durability. We conducted prolonged tests with continuous machine operation over ten days. I personally monitored the test cycles, ensuring the hinges met the performance benchmarks. Our quality control team then handled polishing and coating with strict standards. Below is an overview of our process change:
| Step | Action Taken | Benefit Achieved |
|---|---|---|
| Mold Development | Created stainless steel precision casting mould | Higher density and load capacity |
| Shell Reinforcement | Designed robust external shell mould | Enhanced 3D adjustability and strength |
| Testing | Performed 100,000-cycle open-close trials | Verified long-term durability |
| Final Inspection | Rigorous polishing, coating, and QC inspections | Assurance of high-quality, defect-free hinges |
This comprehensive upgrade and swift replacement ensured that our client’s project moved forward smoothly. They gained confidence in our ability to resolve a critical issue and deliver a product that met their high standards.
I take great pride in our production process. At Glowing Hardware, we blend cutting-edge technology with strict quality control to produce superior concealed hinges for door applications. Our process starts with design, followed by precision mould development, rigorous sample testing, and finally mass production.
Our production involves designing the hinge for optimal load distribution and 3D adjustability, creating stainless steel precision casting moulds for the connecting parts, and using dedicated outer shell moulds for durability. Each batch undergoes strict testing and finishing processes to ensure top performance.
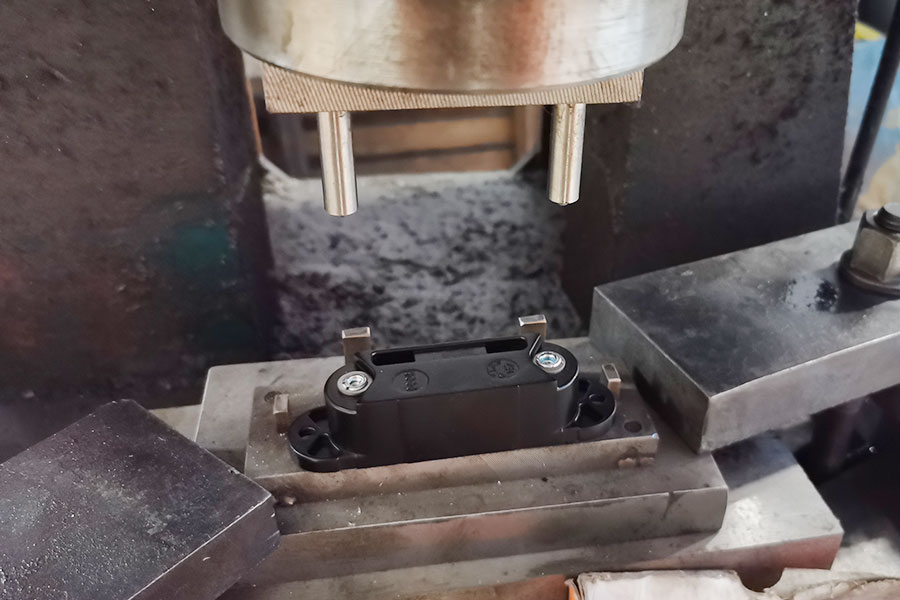
I recall leading the process revision when our client’s project faced hinge failures. My team and I met to re-evaluate every step. First, we redesigned the mould to cast the connection area with a dense structure ensuring higher strength. We then developed a dedicated mould for the hinge’s outer shell to guarantee rigidity while improving the adjustable mechanism. We implemented a continuous 100,000-cycle open-close test, which ran for ten days non-stop, to simulate real-life door usage. The key steps in our production process are summarized in the table below:
| Production Step | Description | Quality Control Measure |
|---|---|---|
| Design Optimization | 3D modeling focused on strength and adjustability | Prototyping and simulation tests |
| Precision Casting | Stainless steel casting using advanced de-waxing and drying techniques | Dimensional and load testing |
| Shell Mould Development | Creating a robust outer shell mould to support 3D adjustments | Rigorous surface and strength checks |
| Sample Testing | 100,000-cycle open-close performance test | Continuous machine operation and inspection |
| Finishing | Polishing and coating with strict QC | Final inspection and client approval |
This detailed process not only enhances the durability of our concealed hinges but also ensures they are visually appealing. I am proud that our rigorous development and testing phases have equipped us to handle high-end projects reliably, setting us apart from competitors. Our client’s satisfaction in Abu Dhabi confirmed that this process was critical in achieving successful and lasting performance.
We turned a critical failure into a showcase of innovation and quality. Our advanced production process and attention to detail solved our client’s concealed hinge issues.